My budget this year determined that I couldn't get my buck mounted professionally. So, after a couple weeks of procrastination and a desire to do something with the antlers and the looming likeliness that if something wasn't done soon, I would have a pretty stinky job ahead, I decided to delve into the art of taxidermy.
With previous experience doing one partial european mount and a lot of googling the internet, I dove right in. It was a little intimidating at first, but as I walked through the process, I found it easier than I thought and I am pleased with the results. This is what I did, in case you are a do it yourselfer and want to give it a try!
Detach the head from the spine at the first vertibrae
Skin the skull starting with a cut beteen the antlers and down the forehead all the way to the top of the nose. Peel one side down to the lower jaw and then the other side.
Remove the lower jaw. This part was tricky for me. Open the mouth wide and begin cutting the muscles back that hold the jaw in place. I discovered a main muscle that hinges the jaw bone at the top of the bone and up through the skull (above the eyes). No bone cutting or sawing is necessary. The lower jaw can be detached with simply a knife, some prying and a little patience. The nose was a bit tricky because I didn't quite know where the nose bone ended. I carefully cut off the end through the cartilage. Don't worry too much about trimming the end of the nose. The confusion is gone when during boiling the cartilage falls off leaving only the bone.
Remove the eyeballs. I used an Exacto knife to carefully cut the membrane around the eye sockets. I then took hold of the loose membrane and pulled with plyers while cutting the remaining membrane behind the eye sockets.
Remove the brain. The brain is very difficult to get to, but you need to remove it before heating the skull in water. There is a hole at the base of the skull where the spine connected. I used a hack saw and carefully cut the hole open a little bigger to make access easier.Then I used a garden hose and stuck the nozzle into the hole shooting a jet stream of water into the cavity. This is a bit messy, but it breaks up the brains and they can be poured out through the hole in small pieces.
Clean the skull of as much flesh as possible. I was careful not to make cut marks or scratches into the bone while doing this. I also used a flat head screw driver.
Make soup. I put the skull into a steel 2 gallon pail filled with water and about a cup of Arm & Hammer Super Washing Soda. I fired up the burner on the bbq and began heating the water. Make sure the antlers are not submerged. Keep the water level just above the skull cap. The antlers spanned the rim of the pale holding the skull secure. The steam will help loosen any flesh at the antler base. I read that this step is definitely an outside job due to the odor. I would advise the same, but I didn't find it as odorous as I expected. The washing soda helped a lot. I kept the water just under a low boil for about 2 hours.
Cleaning. You'll notice the water becomes very oily as the soda does it work to clean it off the skull. Pull the skull out and clean off the loose pieces. I did this with a spoon scraping gently. Pour out the dirty water and refill with clean and another cup of washing soda. I heated it again and let it simmer for about another 2 hours.
Final Cleaning. I let it sit in the water overnight and the next day took it out to do final cleaning. The skull was nearly clean but I spent about half hour rinsing and picking out any remaining flesh. The teeth were not perfectly white. I rather liked the look and the "outline" to the skull the darker teeth provided. So, I did not try to whiten them to the same degree.
Dry. After rinsing I let the skull air dry. Once it dried I was surprised at how white it was.
Whiten. To further whiten I soaked the skull with hydrogen peroxide by pouring and rubbing. Before doing this make sure you wrap the antlers otherwise you will discolor them anywhere the peroxide touches. I wrapped them with saran wrap. Next I soaked paper towels with peroxide and wrapped the entire skull in them. Make sure to press the paper towel against as much bone surface as possible. Now wrap the skull and paper towels with saran wrap to trap the moisture in. I let the skull sit wrapped in peroxide overnight.
Secure Nose Bone. You may notice the nose bone has become loose and is naturally split in the middle. I took some white Elmer's and glued the two pieces together with a small piece of masking tape to hold them in place until dry.
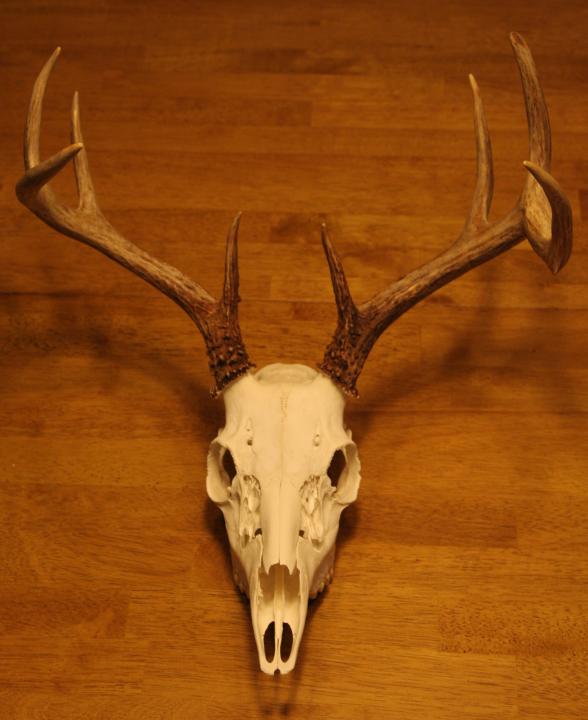
Seal the skull. I was impressed with the clean white finish when I unwrapped it the next day. I let the skull thoroughly dry before sealing it. To seal it, use a small paint brush and coat the entire surface of the skull in white Elmer's glue. This helps preserve the whiteness of the bone and provides an easier surface to dust when cleaning.
Hang it. I fished a piece of wire in the back of the skull through some natural holes and made a loop for a hanger. The european skull mount simply hangs from a nail or screw on our log home wall.
I'm definitely not an expert, but it was a fun experience and it turned out better than I had hoped! Would I do it again? You bet!
See the photos below on the trophy rooms tab.
